Experiencing the death of a beloved pet is not a fun topic, but an important one just the same.
About 67% of U.S. households (or 85 million families) own a pet so the odds that you or someone you know have recently lost a pet are pretty high.
There are many ways to deal with the grief of losing a cherished pet and creating a beautiful urn to honor your furry friend is one of them and I’m going to show you how to make one today.
It’s a super easy project and I think it’s one that you’ll find to be quite therapeutic as well.
OUR DEARLY DEPARTED FUZZYBUTTS
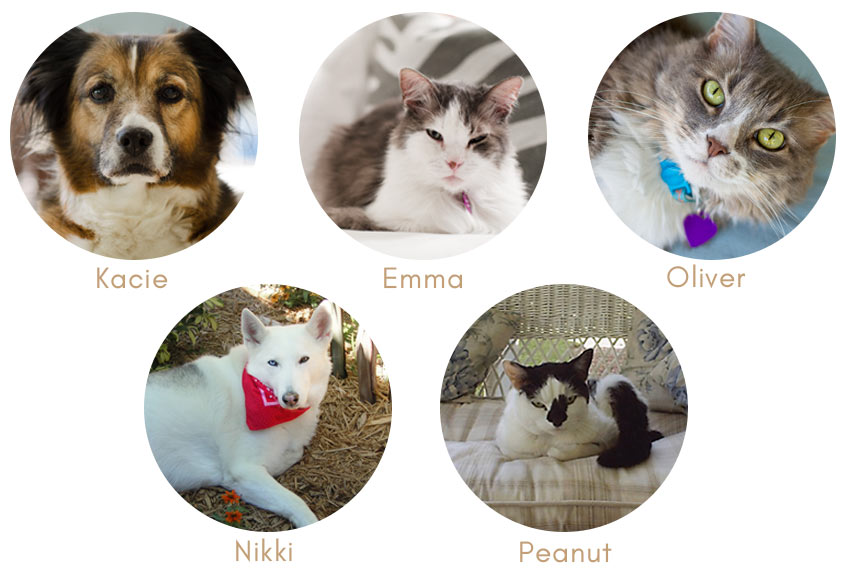
In the past year and a half, The Hubs and I lost 3 long-time members of our pack: Kacie (16), Oliver (17), and Emma (20). We lost Nikki (12) back in 2008 and Peanut (10) in 2003.
Oliver and Emma both died on June 5, 2019. Oliver passed away that morning from a suspected brain tumor and Emma collapsed later that afternoon. It was almost like she wanted to be with her best friend which was painfully bittersweet.
That was such a devastating year for us (we don’t have human children) and Fuzzybutt Farm hasn’t felt quite the same without them. The death of a pet sucks ass – plain and simple as that.
I decided to channel my grief into creating something beautiful and special for all of them and it turned out to be such a cathartic experience for me.
PET URNS DON’T NEED
TO BE UGLY & DEPRESSING!
 Oliver & Emma together on the top shelf, Peanut & Kacie on the middle shelf
After my beloved Kacie died on August 5, 2018, from a suspected brain tumor, I was beyond inconsolable.
Honestly, I didn’t know how I was going to go on in life without her in it.
She was an incredibly special dog and our love for each other had no bounds. Sounds cheesy, but it’s so true. She was my everything. And then she was gone … just like that.
 Nikki has her own special spot on the other top shelf
The veterinarian put her cremated remains in a nice cedar box, but it just screamed, “HELLO – DEAD PET IN HERE!”
Kacie had such an insatiable zest for life and I wanted something to reflect her beautiful, sweet personality and the boring cedar box wasn’t it.
I couldn’t find anything pretty online that didn’t look like an obvious urn, so I decided to go the DIY route and that’s when I came up with the idea of a sea glass bottle.
They easily blend into many decorating styles, and they exude a happy, laid-back, beachy vibe that I love.
I guarantee you will catch yourself smiling whenever you look at them. I know I have!
HOW TO MAKE YOUR BEACH GLASS PET URN
(List of supplies is at the end)

STEP 1: PICK YOUR SEA GLASS COLOR. Krylon offers 8 really pretty colors of their Sea Glass paint (check out all the colors here).
Since my favorite color is aqua, picking “Sea Foam” was a no-brainer for me.
I bought mine (as well as the bottle) at Hobby Lobby so I could use my 40% off coupon. You can use any bottle you want – just make sure it’s going to be big enough to hold your pet’s ashes.

STEP 2: SPRAY LIGHT, EVEN COATS OF SEA GLASS SPRAY ON YOUR BOTTLE. Make sure to let each coat dry thoroughly before spraying another coat.
You can spray as many coats as you like, depending on the look you want.

STEP 3: SPRAY THE CORK WITH GOLD SPRAY PAINT. Skip this step if you’d rather leave the cork its natural color.
Personally, I will always find any excuse to whip out my favorite gold spray paint.
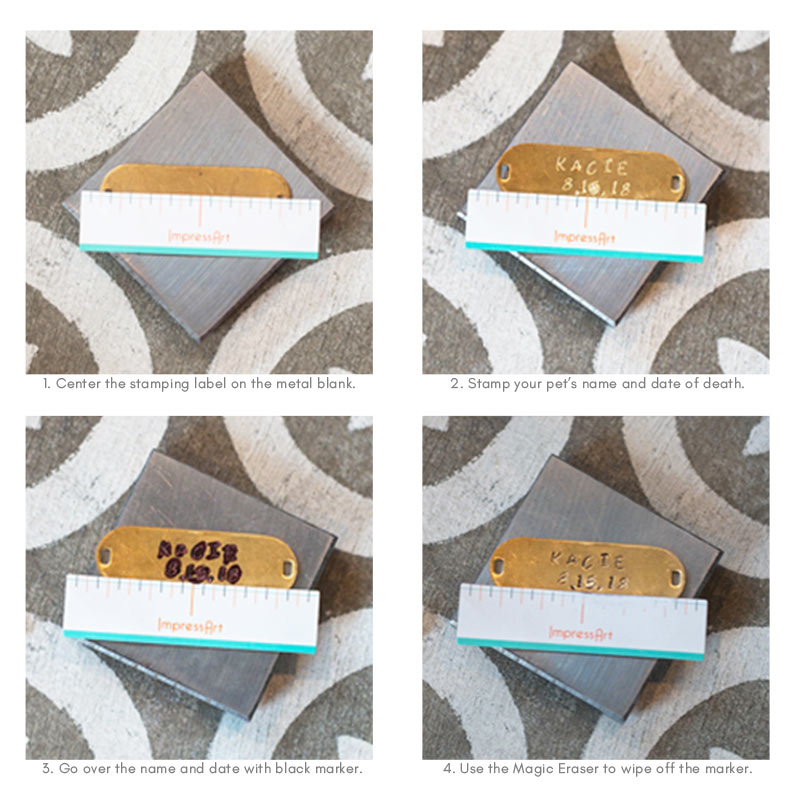
STEP 4: STAMPING YOUR METAL BLANK. You can get really creative in this step, but I only stamped each pet’s name and date of passing simply because of the limited space I had to work with.
You can find metal stamping blanks online in many shapes, sizes, and finish.
Beaducation.com is an awesome source for metal stamping blanks and other stamping products.

REMAINING STEPS: POUR ASHES INTO BOTTLE, GLUE THE CORK, & HANG THE STAMPING PLATE. I’m not gonna lie – it can be pretty emotional seeing your pet’s ashes being poured into the bottle so you might want to ask a friend to do this step for you.
Make sure to use a funnel for an easy, mess-free process. If you don’t have a funnel, just take a piece of copy paper, roll it up like an open-ended burrito and use that as a makeshift funnel.
I used jute cording to hang the stamping plate during my first run with Kacie’s bottle but I have since changed it and used short gold jewelry chain extenders instead.
 Peanut & Kacie
Kacie’s obedience trainer made her that gold filigree heart necklace (about 15 years ago) because she loved her so much.
So I wanted to display that necklace on the bottle and it looks so precious!
 Oliver & Emma, together forever
Since Oliver and Emma passed away on the same day, I decided to put their ashes in one bottle.
I found this to be oddly comforting. Best buds forever in life and death.

FINAL STEP: PROUDLY DISPLAY YOUR PET’S BEAUTIFUL URN IN YOUR HOME.
As I mentioned before, these can easily fit in with many decorating styles.
And they’re so pretty and fun, your guests will never suspect they’re actually pet urns!
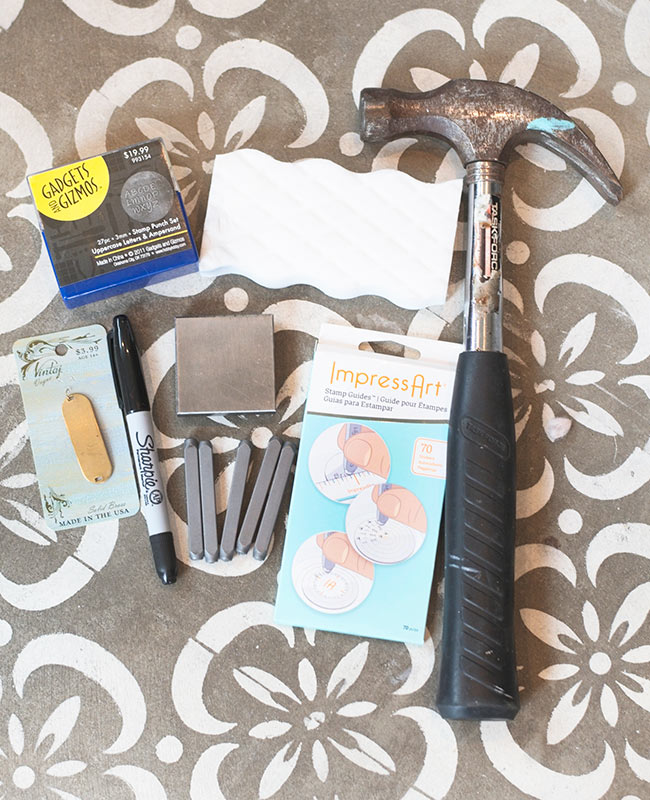
LIST OF SUPPLIES FOR THIS PROJECT
• glass bottle of your choice (big enough to contain your pet’s ashes)
• Krylon Sea Glass spray paint
• cork stopper to fit your bottle (some bottles come with corks at Hobby Lobby)
• gold spray paint (if desired)
• glue for cork
• Magic Eraser
• Sharpie (I used black)
• hammer
• metal stamping blank(s) in desired size, shape, and finish
• metal stamps
• stamping block
• adhesive stamping guides
• chain extenders (if desired)
• thin jute cording (if desired)
If you recently lost a pet, I’m so incredibly sorry for your tremendous loss. I hope that this post inspires you to create something unique and special for your beloved pet’s ashes and that it brings you peace and comfort.
Thank you so much for following my blog and for letting me help you create your own lived-in, loved-in spaces!